Naive_Bayes 실습-colab
나이브 베이즈를 이용한 스팸 분류
PROBLEM STATEMENT
- 5,574개의 이메일 메시지가 있으며, 스팸인지 아닌지의 정보를 가지고 있다.
- 컬럼 : text, spam
- spam 컬럼의 값이 1이면 스팸이고, 0이면 스팸이 아닙니다.
- 스팸인지 아닌지 분류하는 인공지능을 만들자 - 수퍼바이즈드 러닝의 분류 문제!
STEP #0: LIBRARIES IMPORT
import pandas as pd
import numpy as np
import matplotlib.pyplot as plt
import seaborn as sns
%matplotlib inline
from google.colab import drive
drive.mount('/content/drive')
Mounted at /content/drive
import os
# Working Directory Setting 워킹 디렉토리 설정
os.chdir('/content/drive/MyDrive/python/day15')
STEP #1: IMPORT DATASET
emails.csv 읽기
spam_df = pd.read_csv('emails.csv')
# 스팸이면 1, 아니면 0
spam_df
| text | spam | |
|---|---|---|
| 0 | Subject: naturally irresistible your corporate... | 1 |
| 1 | Subject: the stock trading gunslinger fanny i... | 1 |
| 2 | Subject: unbelievable new homes made easy im ... | 1 |
| 3 | Subject: 4 color printing special request add... | 1 |
| 4 | Subject: do not have money , get software cds ... | 1 |
| ... | ... | ... |
| 5723 | Subject: re : research and development charges... | 0 |
| 5724 | Subject: re : receipts from visit jim , than... | 0 |
| 5725 | Subject: re : enron case study update wow ! a... | 0 |
| 5726 | Subject: re : interest david , please , call... | 0 |
| 5727 | Subject: news : aurora 5 . 2 update aurora ve... | 0 |
5728 rows × 2 columns
STEP #2: VISUALIZE DATASET
스팸은 몇개이고, 아닌것은 몇개인지 확인하시오.
spam_df['spam'].sum()
1368
(spam_df['spam'] == 0).sum()
4360
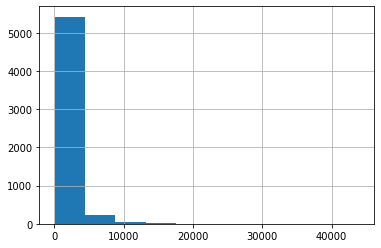
이메일의 길이가 스팸과 관련이 있는지 확인해 보려 합니다. 이메일의 문자 길이를 구해서, length 라는 컬럼을 만드세요.
spam_df['length']= spam_df['text'].apply(len)
글자 길이를 히스토그램으로 나타내시오.
spam_df['length'].hist()
plt.show()
가장 긴 이메일을 찾아서 스팸인지 아닌지 확인하고, 이메일 내용을 확인하시오.
spam_df[spam_df['length']== spam_df['length'].max()]
| text | spam | length | |
|---|---|---|---|
| 2650 | Subject: from the enron india newsdesk - april... | 0 | 43952 |
spam_df.iloc[2650,].values[0]
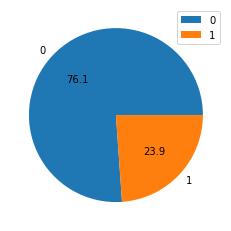
0은 스팸이 아니고, 1은 스팸입니다. 파이차트를 통해, 스팸과 스팸이 아닌것이 몇 퍼센트인지, 소수점 1자리 까지만 보여주세요.
spam_count = spam_df['spam'].value_counts()
plt.pie(spam_count,autopct='%.1f',labels=spam_count.index)
plt.legend()
plt.show()
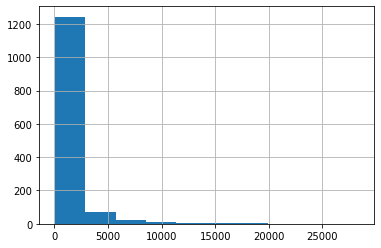
스팸이 아닌것은 ham 변수로, 스팸인것은 spam 변수로 저장하시오.
ham = spam_df.loc[spam_df['spam'] == 0,]
spam = spam_df.loc[spam_df['spam'] == 1,]
# 스팸의 이메일 길이를 히스토그램으로 나타내시오.
spam['length'].hist()
plt.show()
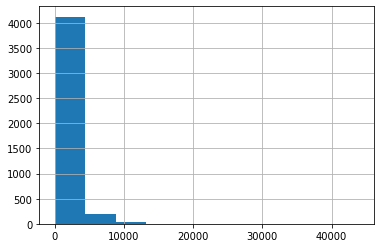
# 햄의 이메일 길이를 히스토그램으로 나타내시오.
ham['length'].hist()
plt.show()
spam_df.corr()
| spam | length | |
|---|---|---|
| spam | 1.000000 | -0.065686 |
| length | -0.065686 | 1.000000 |
STEP #3: CREATE TESTING AND TRAINING DATASET/DATA CLEANING
STEP 3.1 쉼표, 마침표 등의 구두점 제거하기
spam_df.head()
| text | spam | length | |
|---|---|---|---|
| 0 | Subject: naturally irresistible your corporate... | 1 | 1484 |
| 1 | Subject: the stock trading gunslinger fanny i... | 1 | 598 |
| 2 | Subject: unbelievable new homes made easy im ... | 1 | 448 |
| 3 | Subject: 4 color printing special request add... | 1 | 500 |
| 4 | Subject: do not have money , get software cds ... | 1 | 235 |
# 문자열에는 필요없는 글자가 포함되어 있다.
# 마침표, 느낌표, 물결표시 등! 이런것을 punctuation(구두점) 이라고 한다.
# 이것을 먼저 제거한다.
Test = "Hello Mr. Future, I am so happy to be learning AI now!~"
import string
string.punctuation
'!"#$%&\'()*+,-./:;<=>?@[\\]^_`{|}~'
위의 문장에서, 글자를 앞에서부터 하나씩 가져와서, 구두점인지 확인한 후, 구두점이 아닌 문자만 리스트로 저장하시오.
# 결과 예시) [ 'H', 'e', 'l', ... 'M', 'r', ' ','F' ... ]
Test_punc_removed = []
for char in Test :
  if char not in string.punctuation :
    Test_punc_removed.append(char)
print(Test_punc_removed)
['H',
 'e',
 'l',
 'l',
 'o',
 ' ',
 'M',
 'r',
 ' ',
 'F',
 'u',
 't',
 'u',
 'r',
 'e',
 ' ',
 'I',
 ' ',
 'a',
 'm',
 ' ',
 's',
 'o',
 ' ',
 'h',
 'a',
 'p',
 'p',
 'y',
 ' ',
 't',
 'o',
 ' ',
 'b',
 'e',
 ' ',
 'l',
 'e',
 'a',
 'r',
 'n',
 'i',
 'n',
 'g',
 ' ',
 'A',
 'I',
 ' ',
 'n',
 'o',
 'w']
[char for char in Test if char not in string.punctuation]
['H',
'e',
'l',
'l',
'o',
' ',
'M',
'r',
' ',
'F',
'u',
't',
'u',
'r',
'e',
' ',
'I',
' ',
'a',
'm',
' ',
's',
'o',
' ',
'h',
'a',
'p',
'p',
'y',
' ',
't',
'o',
' ',
'b',
'e',
' ',
'l',
'e',
'a',
'r',
'n',
'i',
'n',
'g',
' ',
'A',
'I',
' ',
'n',
'o',
'w']
위의 리스트에 있는 문자들을, 하나의 문자열로 만드시오. 결과 예시) ‘Hello Mr Future …’
''.join(Test_punc_removed)
'Hello Mr Future I am so happy to be learning AI now'
Test_punc_removed_join =''.join(Test_punc_removed)
Test_punc_removed_join
'Hello Mr Future I am so happy to be learning AI now'
STEP 3.2 STOPWORDS(불용어) 제거하기
Stopwords (불용어) 란? - https://bit.ly/34Ipha2
import nltk
nltk.download('stopwords')
[nltk_data] Downloading package stopwords to /root/nltk_data...
[nltk_data]   Unzipping corpora/stopwords.zip.


True
from nltk.corpus import stopwords
my_stopwords = stopwords.words('english')
my_stopwords
구두점 제거한 문자열을, 이제 불용어 단어에 해당하지 않는 단어들만 모아서 리스트로 만드시오. 결과 예시) [‘Hello’, ‘Mr’, ‘Future’ … ]
Test_punc_removed_join.split()
['Hello',
 'Mr',
 'Future',
 'I',
 'am',
 'so',
 'happy',
 'to',
 'be',
 'learning',
 'AI',
 'now']
Test_punc_removed_join_clean = []
for word in Test_punc_removed_join.split():
  if word.lower() not in my_stopwords :
    Test_punc_removed_join_clean.append(word)
[word for word in Test_punc_removed_join.split() if word.lower() not in my_stopwords]
['Hello', 'Mr', 'Future', 'happy', 'learning', 'AI']
STEP 3.3 COUNT VECTORIZER
# 의미 없는 글자도 제거했고, 의미 없는 단어도 제거 했으면,
# 이제는 각 단어를 숫자로 바꿔줘야 학습할 수 있다.

# 단어를 숫자로 맵핑 시키는것을 벡터라이징 이라고 한다. Vectorizing
from sklearn.feature_extraction.text import CountVectorizer
sample_data = ['This is the first document','I loved them','This document is the second document','I am loving you','And this is the third one']
vectorizer = CountVectorizer()
X = vectorizer.fit_transform(sample_data)
vectorizer.get_feature_names_out()
array(['am', 'and', 'document', 'first', 'is', 'loved', 'loving', 'one',
       'second', 'the', 'them', 'third', 'this', 'you'], dtype=object)
X = X.toarray()
이제, 우리의 데이터프레임에 있는, 이메일 내용을 Cleaning 한다.
# 1. 구두점 제거 (글자 제거)
# 2. 불용어 제거 (단어 제거)

# 이 두가지 작업을 하나의 함수로 만들어 준다 => 파이프 라이닝 한다.
import string
import nltk
nltk.download('stopwords')
from nltk.corpus import stopwords
my_stopwords = stopwords.words('english')

def message_cleaning(sentence) :
  # 1. 구두점 제거
  Test_punc_removed = [ char for char in sentence if char not in string.punctuation]
  # 2. 각각 떨어저 있는 글자를, 다시 원상복구(하나의 문자열로 만든다)한다.
  Test_punc_removed_join = ''.join(Test_punc_removed)
  # 3. 문자열을 단어로 쪼개서, stopwords에 들어있는지 확인하여, 중요한 단어만 남긴다
  Test_punc_removed_join_clean = [word for word in Test_punc_removed_join.split() if word.lower() not in my_stopwords ]
  # 4. 중요한 단어들만 남은 리스트를, 리턴해준다.
  return Test_punc_removed_join_clean
[nltk_data] Downloading package stopwords to /root/nltk_data...
[nltk_data]   Package stopwords is already up-to-date!
message_cleaning1 = ("Hello~~!, my name, is hehehe! nice to meet you.")
message_cleaning(message_cleaning1)
['Hello', 'name', 'hehehe', 'nice', 'meet']
이메일의 내용을 벡터라이징 한다.
# 카운트 벡터라이저의 애널라이저 피라미터를, 위의 구두점 제거 + 불용어 제거 하는 함수를 설정해주면
# 함수를 먼저 실행하고 나서 숫자로 바꿔준다
vectorizer = CountVectorizer(analyzer=message_cleaning)
X = vectorizer.fit_transform(spam_df['text'])
# 학습을 위해서 X, y를 셋팅해준다.

# X는 넘파이 어레이 여야 하므로, toarry() 함수 이용해서 넘파이로 가져온다.
X = X.toarray()
y = spam_df['spam']
STEP#4: Training셋과 Test셋으로 나눠서, 학습한다. 테스트셋은 20%로 한다.
from sklearn.model_selection import train_test_split
X_train,X_test,y_train,y_test = train_test_split(X,y,test_size=0.2 , random_state=15)
# 나이브 베이즈 모델링
from sklearn.naive_bayes import MultinomialNB, GaussianNB
classifier1 = MultinomialNB()
classifier1.fit(X_train,y_train)
MultinomialNB()
y_pred = classifier1.predict(X_test)
from sklearn.metrics import confusion_matrix, accuracy_score
STEP#5: 테스트셋으로 평가한다. 분류의 문제이므로 컨퓨전 매트릭스 확인.
confusion_matrix(y_test,y_pred)
array([[857,  12],
       [  4, 273]])
accuracy_score(y_test,y_pred)
0.9860383944153578
classifier2 = GaussianNB()
classifier2.fit(X_train,y_train)
GaussianNB()
y_pred = classifier2.predict(X_test)
confusion_matrix(y_test,y_pred)
array([[856,  13],
       [ 39, 238]])
accuracy_score(y_test,y_pred)
0.9546247818499127
다음 2개의 문장을 테스트 해보시오.
testing_sample = ['Free money!!!', "Hi Kim, Please let me know if you need any further information. Thanks"]
test1 = vectorizer.transform(testing_sample)
test1 = test1.toarray()
test1
array([[0, 0, 0, ..., 0, 0, 0],
       [0, 0, 0, ..., 0, 0, 0]])
classifier1.predict(test1)
array([1, 0])
testing_sample2 = ['Hello, I am Ryan, I would like to book a hotel in Bali by January 24th', 'money viagara!!!!!']
test2 = vectorizer.transform(testing_sample2)
test2 = test2.toarray()
test2
array([[0, 0, 0, ..., 0, 0, 0],
       [0, 0, 0, ..., 0, 0, 0]])
classifier1.predict(test2)
array([0, 1])
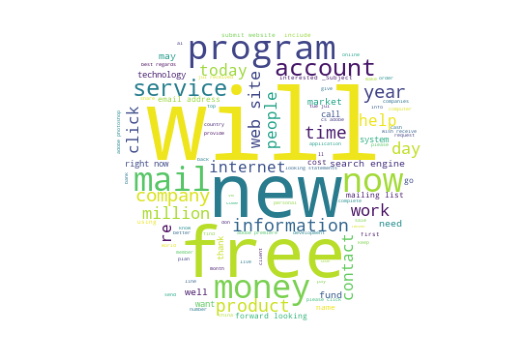
WordCloud Visualizing - 스팸 이메일에는 어떤 단어들이 많이 들어있는지 Visualizing
from wordcloud import WordCloud, STOPWORDS
# 스팸만 들어있는 이메일의 내용을 가져와서, 화면에 어떤 단어가 많이 나왔는지 시각화 합니다.
# 데이터 프레임에 있는 문자열을, 하나의 문자열로 만들어 줘야 한다.
# 1. 각 행의 문자열을, 리스트로 받아온다
spam['text'].tolist()
# 2. 리스트에 들어있는 문자열을 join 함수 이용해서 하나로 만들어 준다.
words_as_one_string= ''.join(spam['text'].tolist())
from PIL import Image
img = Image.open('apple.jpg')
# 이미지를 넘파이로 만들어준다.
img_mask = np.array(img)
# 워드 클라우즈의 스탑워즈를, 내 메모리에 생성해서 사용한다.
my_stopwords = STOPWORDS
my_stopwords.add('subject')
my_stopwords.add('one')
my_stopwords.add('us')
wc = WordCloud(background_color='white',mask=img_mask,stopwords=my_stopwords,max_words=100)
wc.generate(words_as_one_string)
<wordcloud.wordcloud.WordCloud at 0x7f556ef7a050>
plt.figure(figsize=(10,6))
plt.imshow(wc)
plt.axis('off')

plt.show()
spam.head()
| text | spam | length | |
|---|---|---|---|
| 0 | Subject: naturally irresistible your corporate... | 1 | 1484 |
| 1 | Subject: the stock trading gunslinger fanny i... | 1 | 598 |
| 2 | Subject: unbelievable new homes made easy im ... | 1 | 448 |
| 3 | Subject: 4 color printing special request add... | 1 | 500 |
| 4 | Subject: do not have money , get software cds ... | 1 | 235 |
댓글남기기